
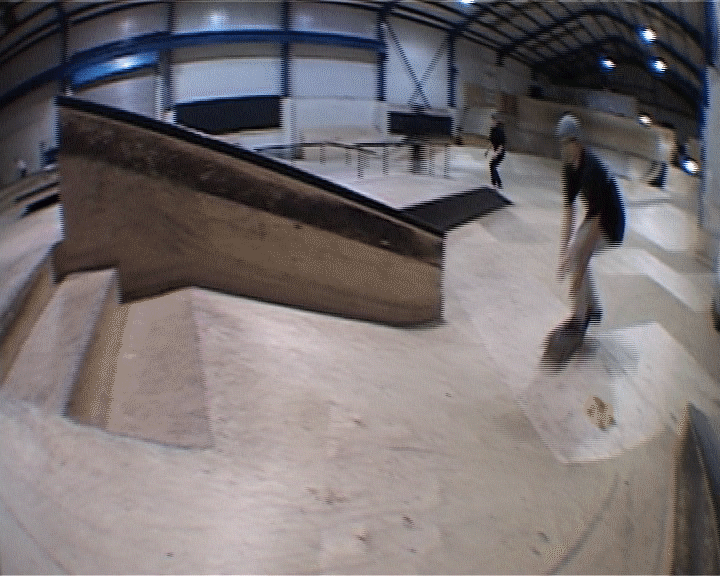
For anyone new to this blog, The Terrible Company has long existed primarily to produce low budget, daft skate videos. I’ve made videos since 2003 and have also burned through a vast array of video cameras. I’m currently filming with a Sony VX2100 – not quite the same as the incredibly desirable VX1000, but it’s smaller, and offers a few improvements over the older model that I personally prefer. However, all of these old skool VX’s suffer from one, horrendously outdated problem: they use MiniDV tapes.
MiniDV tapes: A primer
Video cameras of practically any description in the late 90’s and early 2000’s used MiniDV tapes – a tape format consisting of a 3 inch wide tape that slotted into your camera’s tape deck. It was a format that won out against the more bulky High-8 tape format, and until recently you could still buy MiniDV tapes. In 2021, MiniDV tapes just aren’t worth the hassle though, for the following reasons:
- 90% of issues with video cameras of this era stem from the tape head. At the very least, you get annoying glitching, which is quite prominent in my videos, and at worst, the tape head eats your tapes and flat out stops working.
- MiniDV tapes are no longer in production, meaning we will now start to see a serious drought in tapes. If you want to maintain quality footage, you need to be using new tapes – re-using tapes increases chances of glitching and loss of quality.
- MiniDV tapes were typically locked to a 60 minute maximum recording time. Meaning if you filmed a lot in a single day, there was a lot of faffing about switching tapes over, storing tapes and logging tapes.
- Using masses of plastic tapes to record skateboarding is bad for the environment, ya dummy.
So, if you own a VX, and you don’t want to spend a wild amount of money on upgrading to its modern equivalent, what can you do? Turns out there are a couple of options that will allow you to maintain that much desired VX aesthetic, whilst eliminating the pain in the ass that is MiniDV tapes. If you’re confused and need a hand navigating these waters, don’t worry, because I have already dug into this shit.
The benefits of going tapeless
The basic premise of going tapeless with your MiniDV camera is to record your footage digitally. Rather than recording to tapes, recording digitally uses modern SD cards to store footage. There are some great advantages to this. Footage is recorded and stored in AVI, MP4 or MOV formats, straight to a hard drive your PC can read. This means less time trawling through tapes and capturing in Adobe Premiere. Also because you aren’t using the tape heads – the biggest headache in camera maintenance basically goes away. You can even use these methods on cameras where the tape heads are completely dead.
The FS5
First up is the FS5 digital recorder. I discovered this through the Jenkem video linked above, and this is what sparked my interest in this method of recording footage. Whilst the FS5 is super professional and a fantastic bit of kit, it is incredibly rare and quite expensive (It took me forever to find one online, and even then it was double what I paid for my VX in the first place). If you’re out here filming stuff for legit board companies that are paying you for footage, then go all out for this one – having said that if you are being paid to film you should be able to afford a modern camera! For what I was doing, I needed something cheaper.
Using your phone
The next solution I encountered was recording to my phone. This method is actually genuinely fascinating: the benefits are that you can record or stream straight to Instagram or Youtube from a VX (which is WILD), and seeing as most of us have mobile phones, the priciest bit of kit you need is already accessible to us and abundant.
Where this method falls down, in my opinion, is the unnecessarily complicated cable setup. I don’t know about you, but my camera bag is super compact and lightweight. I already stuff 3 batteries and a light (that mounts onto my camera) in there. I don’t have room for 5 different cables, 2 bulky cable adapters, and a battery to power one of the cable adapters. Not to mention one of the adapters is an Elgato product, which I have always found to be pricey.
Once this is all setup, it’s an unwieldy, tangled mess of wires and cables. Sure the benefit of having that instant connection to post to social channels is nice, but phones already come equipped with amazing cameras that are just fine for uploading a single clip of your buddy slappying a curb. Going through all of this just to mount a phone on your VX just seemed a bit too much for me.
The ImmersionRC Powerplay
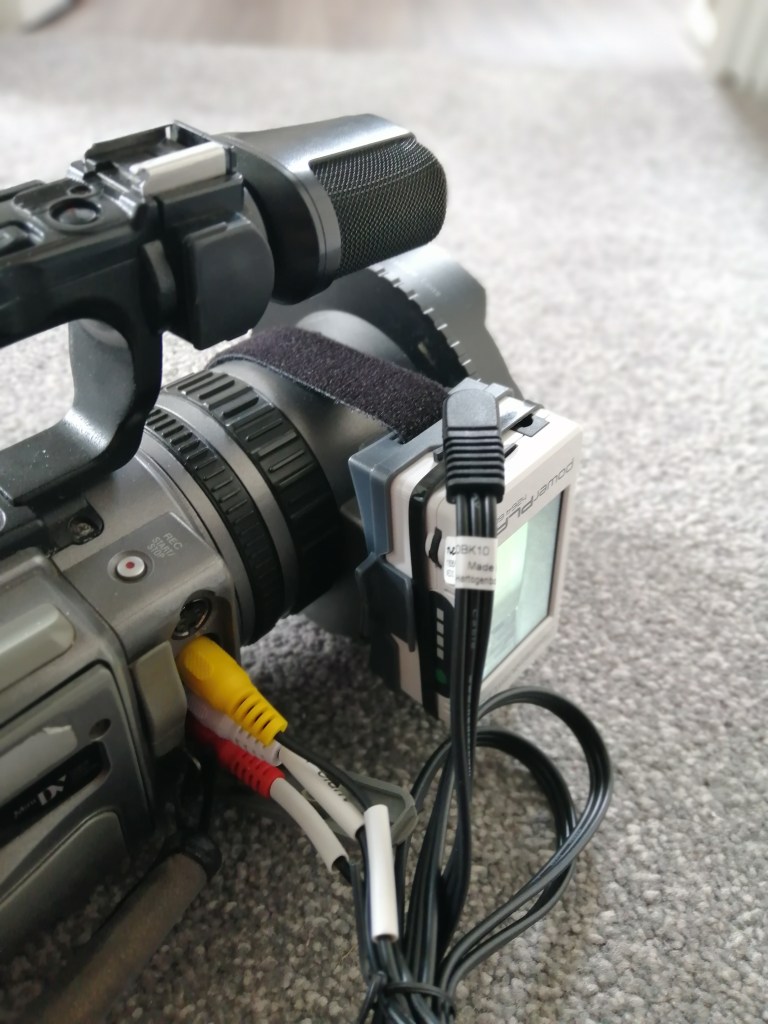
And so we reach the solution I actually went with. The ImmersionRC Powerplay, which I discovered from the video above, is a digital recording device designed for drones and VR headsets. It turns out, with the right cable (notice I said cable, and not cables) you can plug this bad boy straight into your VX and get all of the digital recording benefits you get from the more expensive FS5. And the best bit: it’ll set you back 80 quid.
The price, compact nature and simplicity of the cable setup were enough to get me on board. The device needs rechargeable batteries, but everything is housed inside the device – no external batteries, no masses of cables required, just a small box attached to your camera, plugged into your camera’s A/V ports with an RCA cable. If you don’t own one already, you’ll need a mini SD card, but you can get a 32GB card pretty cheap, and these allow you to store a lot of footage (more than enough for a single session). All in it’s probably just over 100 quid to get set up with this method, which is a very reasonable price.
Teething Problems
Originally when I first started using the ImmersionRC Powerplay, the AV In connection was a little bit spotty. The feed from the camera only gets picked up if the jack is half plugged in, and I had to order a bespoke 3D printed spacer to get it to work.
After a bit of research from Neon Airship (the channel whose videos are mentioned above), he discovered there was a very specific reason for this issue occurring. It turns out different 3.5mm jacks have different configs for Left Audio, Right Audio, Video Feed and Ground. Some cables just straight up won’t pick up any video signal, and the most abundant types of AV in/3.5mm jack cables only pick up left audio and video when plugged in partway (hence why it works with the 3D printed spacer).
After my initial run with the spacer solution I found the cable kept coming out, and that I lost audio after filming a couple of clips. Luckily Neon Airship found a very specific set of OMTP 3.5mm jack cables that did the trick and allows you to plug the cable all the way in, picking up Left and Right audio, and the video feed, so I ordered one of those, and that did the trick. Check the video below for the lowdown.
Fitting it all together
I mentioned that the VX2100 is my preferred VX because of how compact it was… In this case it’s a bit of a downside, as it leaves very little room for places to strap/add on the ImmersionRC. I ended up using some velcro cable straps and the included plastic mount to strap it onto the housing for the lens as this was the only place that would keep it stable, near the AV sockets, and still allow me to carry the camera comfortably whilst filming. From this experience, if you have a VX1000 you’ll have better luck, as I’ve seen people use sticky pads and velcro strips to place the device in a few different locations with ease, and still have a nice comfy place for your hand to sit whilst filming.
The VX also has a habit of switching off whilst filming using this method. This happens more frequently if you have a tape in the deck. The reason for this is that you aren’t recording using the tape for the ImmersionRC method, so from the camera’s point of view it’s just sitting in Standby with no recording, and by default it’s programmed to switch itself off to save on battery when this happens.
When you eventually take the tape out and use the ImmersionRC by itself, after filming for about 10-15 minutes the VX2100 shows a weird warning about battery usage and covers your screen with some annoying warning text. Most of the camera UI doesn’t get picked up by the ImmersionRC’s recordings, but this warning sequence does, so every once in a while you need to just restart the camera to get this stuff off the screen
The alternative to all of this is the more expensive and/or cumbersome options mentioned earlier, and if that seems better to you, then that’s all good. I chose the ImmersionRC due to cost reasons, and I honestly think it is the best value. Sadly the ImmersionRC has been discontinued by it’s manufacturer, but there are some alternative devices cropping up, all with varying quality. I tend to keep an eye on Neon Airship’s channel for reviews and experiments with these, as he does a great job summing up the benefits and showing examples of how the footage comes out.
It might seem weird to put this much time and effort into keeping these old VX’s running, but I have a special place in my heart for camcorders of this era, and I also am not a professional in this field by any stretch of the imagination. As someone who loves to nerd out about the old VX line, I welcome the ability to keep these cameras going, and to find ways for them to merge with our more digital, modern techniques. I love the chromatic aberration and iconic look of VX footage, and although I would welcome a HD/4K solution at a reasonable price, for now I’d be happy to use any of the methods above to keep my camera ticking along.

If any of this is useful to you, I welcome your thoughts on it – The skate filmer community, especially those of us making these low budget, local style videos, is small and always budget conscious, and knowledge sharing definitely helps us make better videos. Are you sad that MiniDV tapes are on their way out? Are you skeptical of these digital solutions? Do you have a great method of recording digitally that I have missed? Let me know in the comments below.

Are tthere any as good alternatives to the immersionrc powerplay? They seem to be almost impossible to get hold of now
LikeLike
Good question… I’m not entirely sure. Shortly after I posted this blog post they discontinued the immersionrc power play, which has caused this massive spike in prices for them. There are definitely alternative devices but I don’t know too much about them, or they are more expensive. My advice would be to keep an eye on eBay and see if you can get lucky with a deal on the powerplay.
Personally I think next time I upgrade I am likely to go with a more modern HD cam and go with something that has built in SD card support. As much as I love the VX it’s really starting to get hard to maintain them and keep them running 😞
LikeLike
I use the powerplay device on my vx2100 and it works a treat. But unfortunately when trying to connect to myother vx2000 camcorders it will not record with audio. Do you know anything about how to fix this issues ? Thanks!
LikeLike
Sounds like it’s something to do with the way the AV cable is bringing in your audio? Might be worth ordering another cable with the audio channels on the AV plug in different configurations… That was the biggest pain with trying to get mine working, and it took some experimentation with cables to find the right one.
LikeLike
Thanks for the great information in your original posts. As of a few months ago, Powerplays are once again available and someone has made proper cables and mounts to make the integration seamless. Check out: https://devbuild.digital/ or search for DEVBUILD
LikeLike